William Sonoma Peppermint Bark Copycat: Better & Cheaper
The holiday season unfurls a tapestry of festive traditions, and for many, that includes indulging in the crisp, minty delight of peppermint bark. While commercial versions, particularly the famed one from William Sonoma, captivate with their elegant presentation and irresistible flavor, they often come with a premium price tag. What if you could capture that same gourmet magic, or even surpass it, in your own kitchen for a fraction of the cost? This comprehensive guide will show you how to craft a William Sonoma peppermint bark copycat that is not only significantly cheaper but arguably better, thanks to fresh ingredients and customizable flavors. Forget those costly treats; it's time to unleash your inner confectioner and master this iconic holiday staple.Unveiling the Homemade Advantage: Why Your Peppermint Bark Will Reign Supreme
There’s a unique satisfaction in creating holiday treats from scratch, and peppermint bark is no exception. While the store-bought versions offer convenience, they often fall short in freshness and the vibrancy of flavor that homemade can deliver. Crafting your own Easy Peppermint Bark: Your Go-To Holiday Gift Recipe allows you to control every ingredient, from the quality of the chocolate to the intensity of the peppermint, resulting in a superior product. This isn't just about saving money – though that's a significant perk – it's about elevating your holiday treats to a new level of deliciousness.The Cost-Benefit Analysis: Homemade vs. Store-Bought
The premium price tag on gourmet peppermint bark can be substantial, often upwards of $30-$40 for a modest tin. When you consider the simple components of a classic peppermint bark recipe – chocolate, peppermint oil, and candy canes – it becomes clear that a significant portion of that cost goes towards branding and packaging. By making it yourself, you can produce a generous batch for a fraction of the price, leaving more room in your budget for other festive goodies or gifts.
Freshness and Flavor Control
Homemade means fresh. You're using recently melted chocolate and freshly crushed peppermint candies, ensuring maximum aroma and crunch. Moreover, you dictate the peppermint intensity. Do you prefer a subtle whisper of mint or a bold, invigorating burst? With a homemade peppermint bark recipe, the power is in your hands, allowing you to tailor the flavor profile to your exact preferences, something store-bought options simply can't offer.
The Essential Ingredients: Crafting Your Signature Peppermint Bark
At its heart, this beloved holiday confection relies on just a few key ingredients. However, understanding the nuances of each can make all the difference in transforming a simple treat into a truly exceptional one.The Foundation: White Chocolate Choices
White chocolate forms the creamy, sweet base of traditional peppermint bark. But not all white chocolate is created equal. True white chocolate is made from cocoa butter, milk solids, and sugar. Cocoa butter provides that luxurious melt-in-your-mouth texture. Many white "chocolate" chips, however, contain minimal cocoa butter and often include vegetable fats, which can result in a waxier texture and an overly sweet, less complex flavor.
- High-Quality White Chocolate Bars: For the absolute best results, opt for premium white chocolate bars (look for those with a high cocoa butter content). These will melt smoother, taste richer, and be less cloyingly sweet, providing a perfect counterpoint to the sharp peppermint.
- White Chocolate Chips: While convenient, choose a reputable brand that prioritizes quality. If using chips, be aware they might be sweeter, so adjust your peppermint oil slightly.
Pro Tip: Avoid "white melting wafers" or "candy melts" as they are designed for easy melting but sacrifice flavor and texture, often containing very little actual cocoa butter.
The Peppermint Punch: Oil, Extract, or Candy?
This is where the magic happens! The peppermint flavor is crucial, and you have a couple of options:
- Peppermint Oil: This is our top recommendation for a vibrant, long-lasting peppermint flavor. Peppermint oil is incredibly potent, meaning just a few drops are sufficient to infuse your bark with intense mintiness. A small bottle lasts forever and is a pantry essential for many holiday baking projects beyond just this peppermint bark recipe.
- Peppermint Extract: While more readily available, peppermint extract is alcohol-based and generally less concentrated than oil. You'll need to use more of it to achieve the same intensity, and its flavor can be slightly less "clean." If using extract, start with a teaspoon and adjust to taste.
- Crushed Peppermint Candies: These are indispensable for both flavor and texture. Whether you use classic red and white candy canes or pre-crushed peppermint candies, they provide a delightful crunch and a burst of mint with every bite.
The "Optional" Dark Chocolate Layer: Elevating Your Bark
While William Sonoma's classic bark often features just white chocolate, adding a thin layer of dark chocolate can truly elevate your homemade version, making it even "better" than the original. The slight bitterness of dark chocolate (we recommend 60-70% cacao) provides a sophisticated contrast to the sweet white chocolate and bright peppermint. It also adds visual appeal, creating striking layers.
Your Step-by-Step Guide to the Ultimate Peppermint Bark Recipe
Making this festive treat is surprisingly simple and requires minimal equipment. Here's how to create your show-stopping peppermint bark:Preparation is Key
Start by lining a baking sheet (a standard 9x13-inch pan works well, or a larger 10x15-inch for thinner bark) with parchment paper. This is crucial for easy removal once the bark has set. Have your crushed peppermint candies ready – you can crush candy canes in a zip-top bag with a rolling pin for a rustic texture or use pre-crushed varieties.
Melting Magic: Creating Smooth Chocolate Layers
The key to perfect bark is smoothly melted chocolate. You can achieve this using a microwave or a double boiler.
- Microwave Method: Place chopped chocolate or chips in a microwave-safe bowl. Heat in 30-second intervals, stirring well after each, until smooth. Be careful not to overheat, as chocolate can seize and become grainy.
- Double Boiler Method: Place chocolate in a heatproof bowl set over a pot of simmering water (ensure the bowl doesn't touch the water). Stir constantly until melted and smooth. This method provides more gentle, controlled heat.
Once your white chocolate is melted, stir in your peppermint oil (start with 1/4 to 1/2 teaspoon for a standard batch, adjusting to your preference). Remember, it's potent!
The Art of Layering
- Dark Chocolate Layer (Optional): If using, melt your dark chocolate first. Pour it onto the prepared baking sheet and spread it into a thin, even layer using an offset spatula. Place it in the refrigerator for 10-15 minutes, or until just firm to the touch.
- White Chocolate Layer: Once the dark chocolate is set (or directly onto the parchment if skipping dark chocolate), pour your melted, peppermint-infused white chocolate over it. Spread evenly to the edges of the pan. Work relatively quickly, as the white chocolate will start to set.
The Peppermint Topping
Immediately after spreading the white chocolate, generously sprinkle your crushed peppermint candies over the entire surface. Gently press them into the chocolate with the back of a spatula or your hands to ensure they adhere well. This is a great step for kids to help with!
Setting and Snapping
Allow the bark to set completely. You can do this at room temperature for several hours (at least 2-3) or in the refrigerator for about 30-60 minutes. Make sure it's fully hardened before attempting to break it. Once firm, simply lift the parchment paper from the pan and gently snap the bark into rustic, irregular pieces. There's no need for perfect squares; the jagged edges are part of its charm! For more tips on snapping and gifting, check out our guide to Easy Peppermint Bark: Your Go-To Holiday Gift Recipe.
Beyond the Basics: Gifting, Storage, and Creative Twists
This homemade peppermint bark recipe isn't just a treat for your family; it's a fantastic, economical gift that spreads holiday cheer.The Perfect Holiday Gift
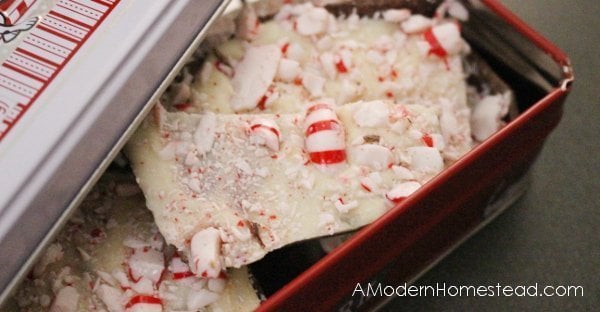
Homemade peppermint bark makes for an incredibly thoughtful and impressive gift. It’s super easy to make, and unlike many holiday cookies, it boasts a longer shelf life. Package pieces in cellophane bags tied with festive ribbons, stack them in decorative tins, or add them to your holiday cookie boxes. Attach a cute gift tag, and you've got a personalized present everyone will adore. Its rustic charm and irresistible flavor make it a standout.
Storing Your Masterpiece
One of the best qualities of peppermint bark is its make-ahead potential. It stays fresh for a good while, allowing you to prepare it in advance of holiday gatherings or gifting needs.
- Room Temperature: Store bark in an airtight container at room temperature for up to three days.
- Refrigerator: For longer storage, keep it in an airtight container in the refrigerator for up to three weeks. Layer pieces with parchment paper to prevent sticking.
- Freezing: While technically possible, freezing is generally not recommended for peppermint bark. The cold temperature can cause the white chocolate to become chalky, develop streaks, or alter its texture, diminishing its quality.
Customizing Your Ingredient Microwave Peppermint Bark: Fast & Festive Treat
Beyond the optional dark chocolate layer, you can get creative with your peppermint bark recipe:
- Sprinkles: Add a dusting of festive holiday sprinkles on top of the crushed peppermint for extra sparkle.
- Different Mints: While classic peppermint is king, consider experimenting with spearmint oil for a milder, slightly different flavor profile.
- Nutty Crunch: A very thin layer of finely chopped pecans or walnuts could be added between the chocolate layers for an extra textural dimension, though this deviates from the traditional.
